INFOnline Measurement Manager Integration via Google Tag Manager
Google Tag Manager Integration Simple (no mobile / desktop distinction)
Please note that there are two versions of the Google Tag Manager integration guide. One is labelled simple and the other advanced. The difference between the two integration guides is, that the simple one leaves out a distinction between mobile and desktop devices. If you don't have a mobile and a stationary website, the simple guide is sufficient.
The advanced Google Tag Manager integration guide describes how to set up a detection of mobile and desktop devices and uses this information to differentiate between mobile and stationary websites.
This exemplary guide will explain step by step how to integrate the INFOnline Measurement Manager with the Google Tag Manager on your website.
Conditions and intended use
The INFOnline Measurement Manager (web) can be integrated with the Google Tag Manager. The Google Tag Manager is used to manage tags on your website. Without editing the site code directly, you use the GTM user interface to add tags like the INFOnline Measurement Manager (web).
We offer an optimized solution to integrate the INFOnline Measurement Manager (web) seamlessly with the Google Tag Manager, while we still recommend to use the standard integration of the Measurement Manager.
Prerequisites
- Relay client container (hosted by INFOnline or self-hosted)
- Registered domain service name as CNAME (hosted by INFOnline), AAA(A) (self-hosted) DNS entry
- Site ID provided by INFOnline GmbH
- Google Tag Manager Account
Setting up tags in Google Tag Manager
We are going to create one trigger, one variable and three tags in the Google Tag Manager to integrate the INFOnline Measurement Manager (web) on your website. All steps are necessary to integrate the INFOnline Measurement Manager (web) via Google Tag Manager. The path shown is the classic implementation of a customer with a single website and no differentiation between mobile and desktop / stationary.
Create a constant variable for the domain service name
Attention
This approach only works if you have a website that uses only one domain service name. In case a distinction between mobile and stationary / desktop needs to be made (with two different domain service names), you need to follow the advanced guide.
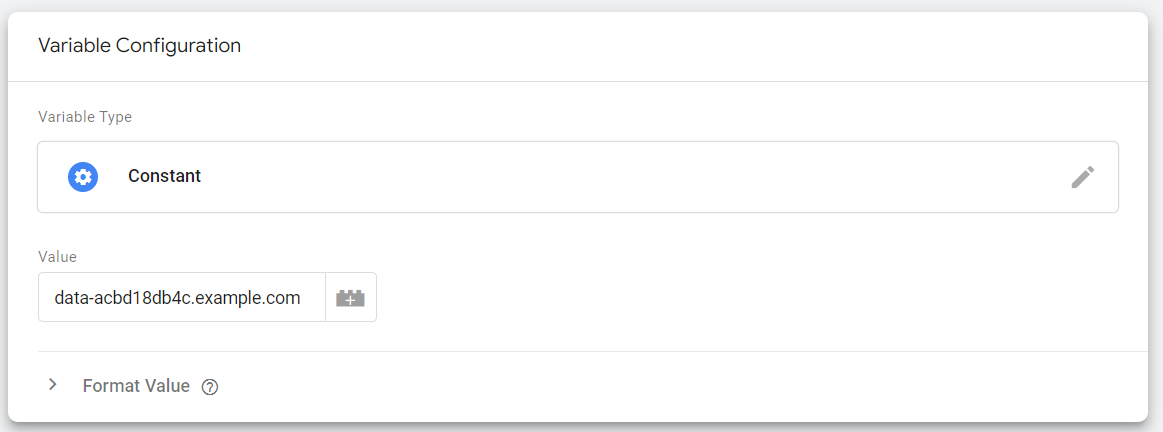
To add a constant variable for the domain service name of the service platform please click on Variables and then under User-Defined-Variables on New to create a new variable. On the popup slide top left choose a meaningful name for the variable. We recommend to use dsn as name. Then click on Choose a variable type to begin setup. Please select Constant as Variable type and the domain service name of the service platform (CNAME) as value and click save.
The dsn will be later used in the dsn macro in all tags.
Create the tag to load the manager
In your Google Tag Manager Account, click on Tags and then on New to create a new tag.
Give your tag a meaningful name and then click on Tag Configuration.
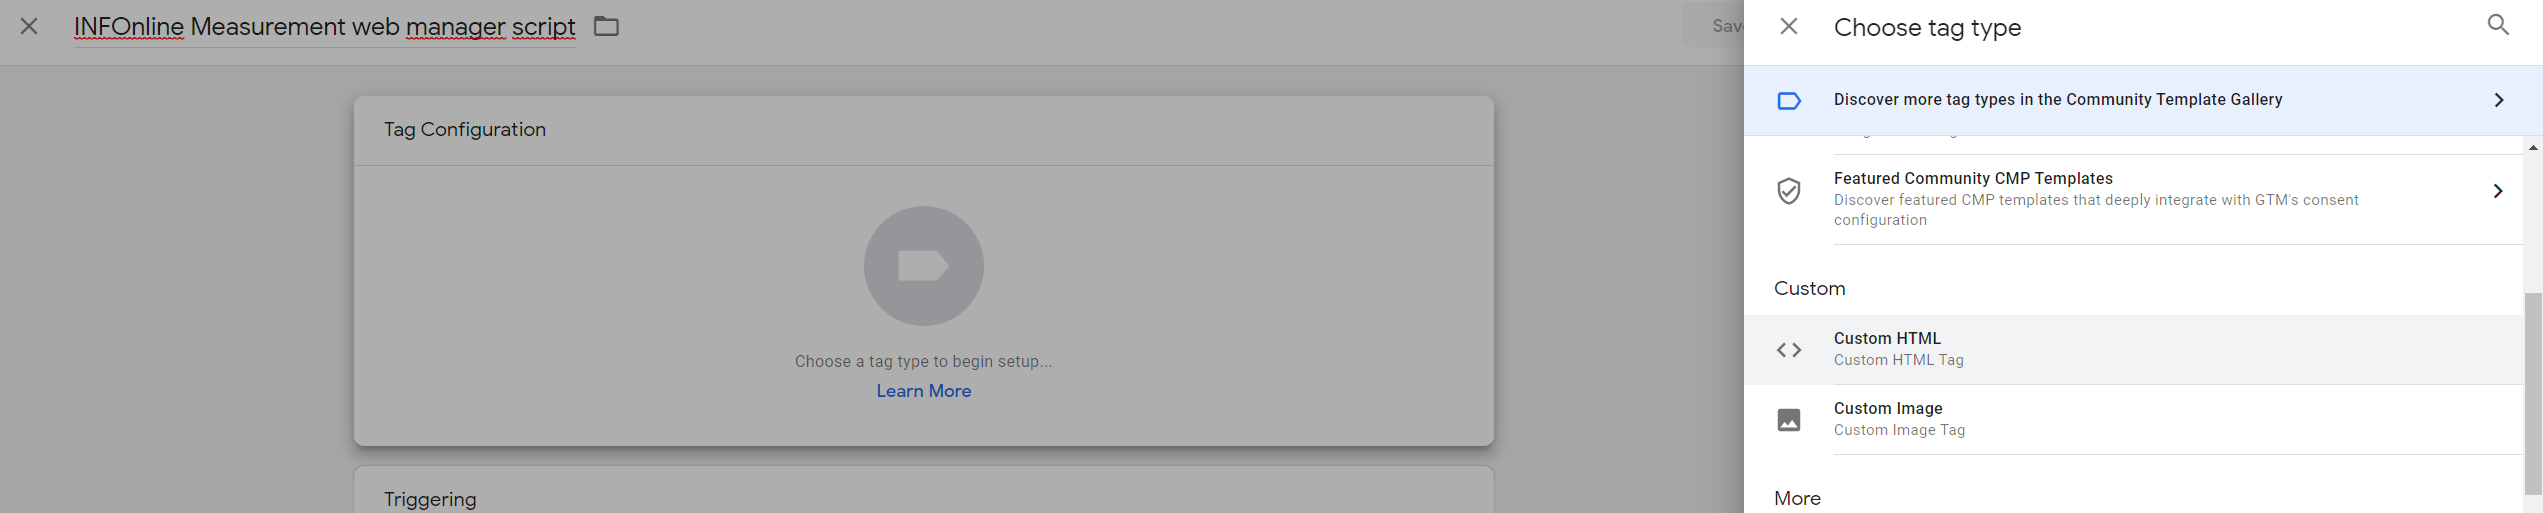
You need to select Custom HTML from the list.
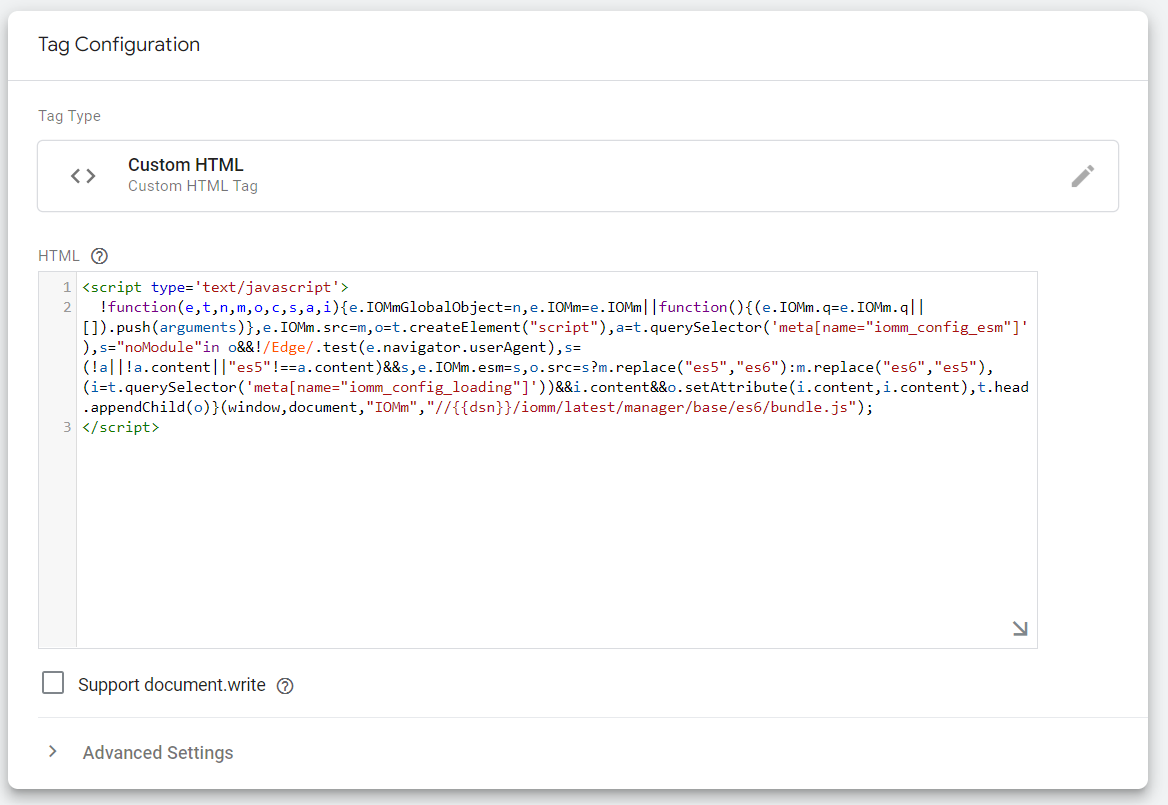
Now we need to paste the following code into the HTML editor:
1 2 3 | |
The dsn macro will be replaced automatically with the AAA(A) or CNAME DNS entry of the service platform (relay client) from the dsn constant variable specified in the step above.
It should look like this now:
Lastly we need to add a trigger, that will fire the tag when loading the website. For this click the Triggering area and select the Page View trigger type (All Pages).

Now we can save the first tag in the Google Tag Manager.
Create the tag to execute the configure & pageview command
After we created the first tag to load the INFOnline Measurement Manager (web) script, we now need to create another tag to execute the configure and the pageview command.
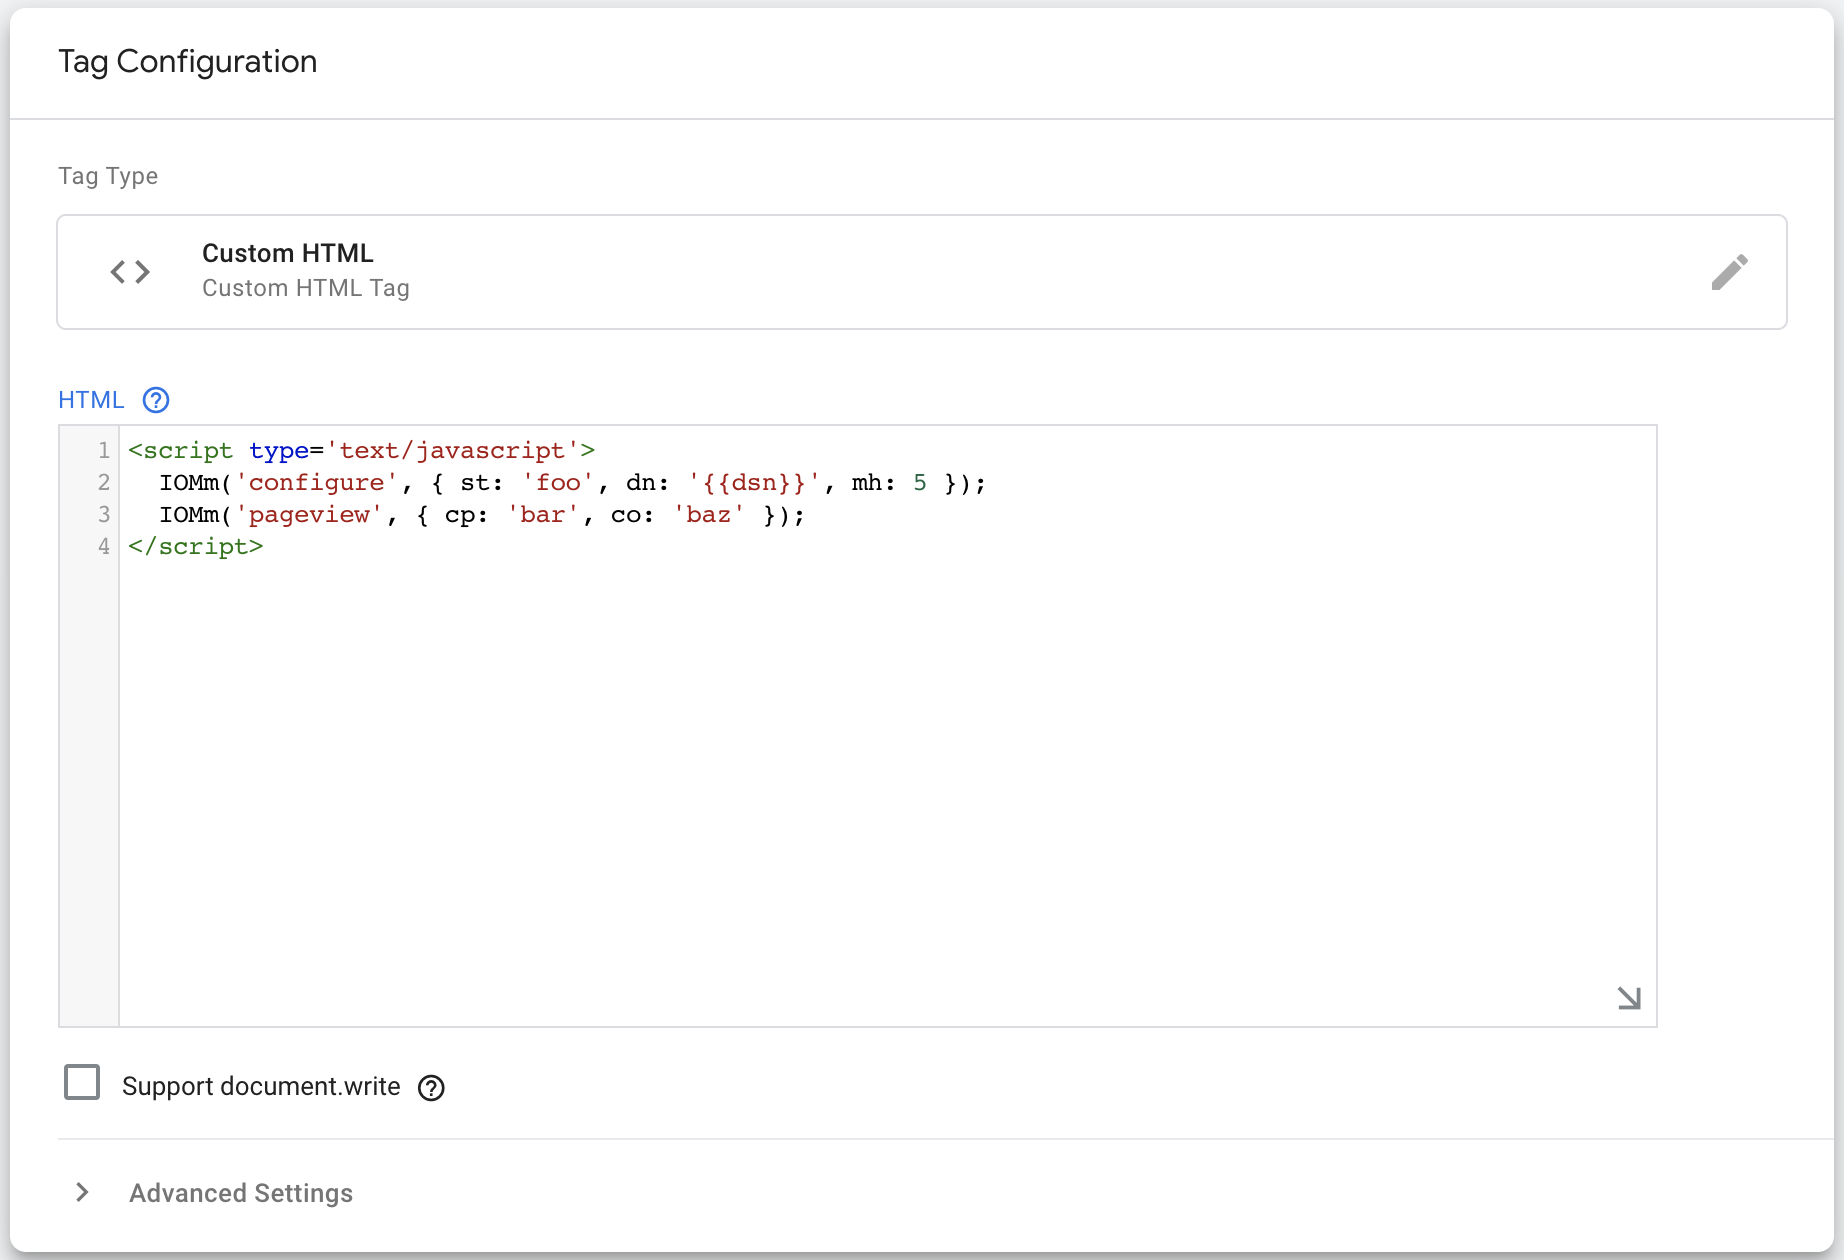
Just like for the first step, we need to create a new tag, select Custom HTML from the list and paste the following code into the HTML editor:
1 2 3 4 | |
Please note that this is just an exemplary integration of commands. For the full list of available commands and the associated parameters, refer to the standard integration of the Measurement Manager.
Now this is what it should look like:
Lastly we need to add a trigger, that will fire the tag when loading the website. For this click the Triggering area and select the Page View trigger type (All Pages).
Now we can save the second tag in the Google Tag Manager.
Publishing & Integrating the Google Tag Manager
After we created, edited and saved the two tags to load the INFOnline Measurement Manager (web) and execute commands, it is time to publish our container.
You need to publish the container each time you make changes to the tags in order for them to take effect. To do this click the Submit button on the right side of your Workspace screen in the Google Tag Manager.
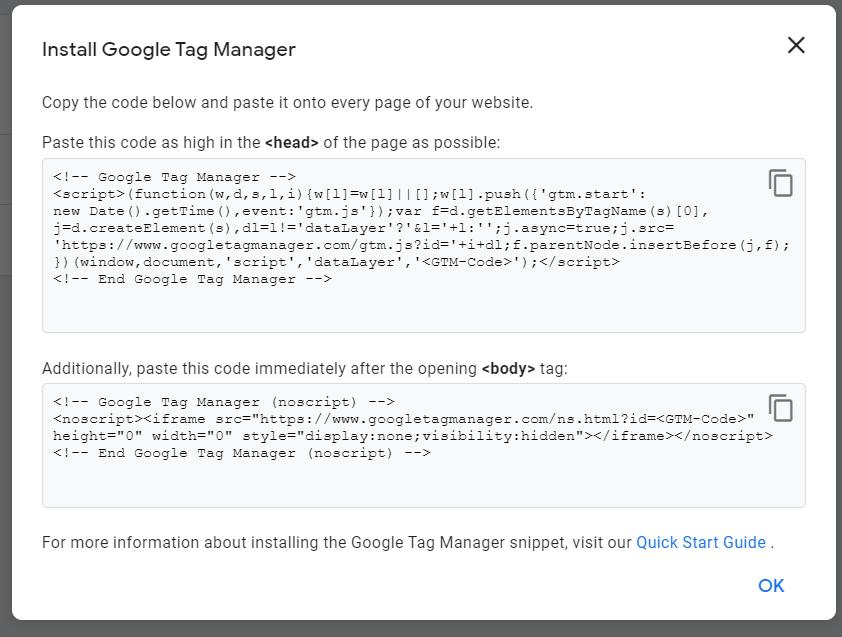
If you haven't already done so, you need to integrate the Google Tag Manager on your website. For this please click on the container ID (GTM-XXXX) on the right side of your Workspace screen in the Google Tag Manager. A popup will show up with code snippets and instructions. Please follow the instructions to integrate the code snippets on your website.
Different forms of integration
The above described integration of the Google Tag Manager is just exemplary. There are more ways to integrate it on your websites, especially by separating or using different commands (refer to the standard integration of the Measurement Manager for all available commands).
Please note that in any cases you always have to load the bootstrapping script with the Google Tag Manager when loading the website (described in the first step). It will load the best version of the INFOnline Measurement Manager (web) for the current contest and is therefore always needed.
What you can do is split the commands into separate tags in the Google Tag Manager, or use different commands.
As opposed to using a single tag for the configure and the pageview command like we did in step two, we could split the into two tags by using two Custom HTML elements - one for each command:
1 2 3 | |
1 2 3 | |
Attention
Please note that the configure command will only have to be executed once per page load.
If you have a Single Page Application, where you load the website once and subsequent changes of the view are handled internally by the framework without reloading the website, you will need to trigger the pageview command each time a new view is shown (Google recommends the History change trigger for this).
This does not apply to "standard" serverside rendered website, where each change of the view means a new request. There you still will need to trigger the configure & pageview commands for each website load.
Google Tag Manager Integration Advanced (mobile / desktop distinction)
The advanced Google Tag Manager integration guide describes how to set up a detection of mobile and desktop devices and uses this information to differentiate between mobile and stationary websites.
We offer an optimized solution to integrate the INFOnline Measurement Manager (web) seamlessly with the Google Tag Manager, while we still recommend to use the standard integration of the Measurement Manager.
Conditions and intended use
The INFOnline Measurement Manager (web) can be integrated with the Google Tag Manager. The Google Tag Manager is used to manage tags on your website. Without editing the site code directly, you use the GTM user interface to add tags like the INFOnline Measurement Manager (web).
Prerequisites
- Relay client container (hosted by INFOnline or self-hosted)
- Registered domain service name as CNAME (hosted by INFOnline), AAA(A) (self-hosted) DNS entry
- Site ID provided by INFOnline GmbH
- Google Tag Manager Account
Setting up tags in Google Tag Manager
We are going to create one trigger three variables and three tags in the Google Tag Manager to integrate the INFOnline Measurement Manager (web) on your website. All steps are necessary to integrate the INFOnline Measurement Manager (web) via Google Tag Manager. However, the steps may differ depending on how the content is delivered by the customer (mobile or desktop). The path shown is the classic implementation of a customer with a mobile as well as a stationary website and with the associated site definition.
Create a custom variable for the device type
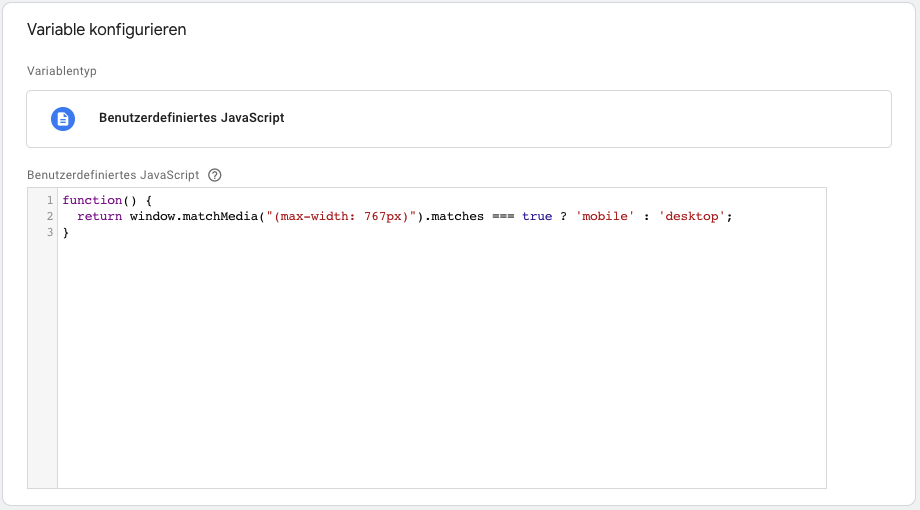
In your Google Tag Manager Account, click on Variables and then under User-Defined-Variables on New to create a new variable. On the popup slide top left choose a meaningful name for the variable. We recommend to use device as name. Then click on Choose a variable type to begin setup. Please select Custom JavaScript and paste following code to the code input
1 2 3 | |
'mobile' (device width < 768px) or 'desktop' (device width>= 768px) according to the media query result. When done click save.
The boundary of the device distinction between mobile and desktop has been deliberately made according to the general specifications of responsive design. It is a recommendation but the customer can also use their own value here. However, he must be aware that he then does not comply with the standard.
Attention
The determination of the device type by checking the viewport is problematic because on mobile devices the code above will return desktop on mobile devices like tablets or Smartphones with HDR support (iPad for example) when used in portrait mode. So the customer has to decide if he should support all types of mobile devices and there is always a chance for a mismatch.
Create a lookup table variable for the domain service name
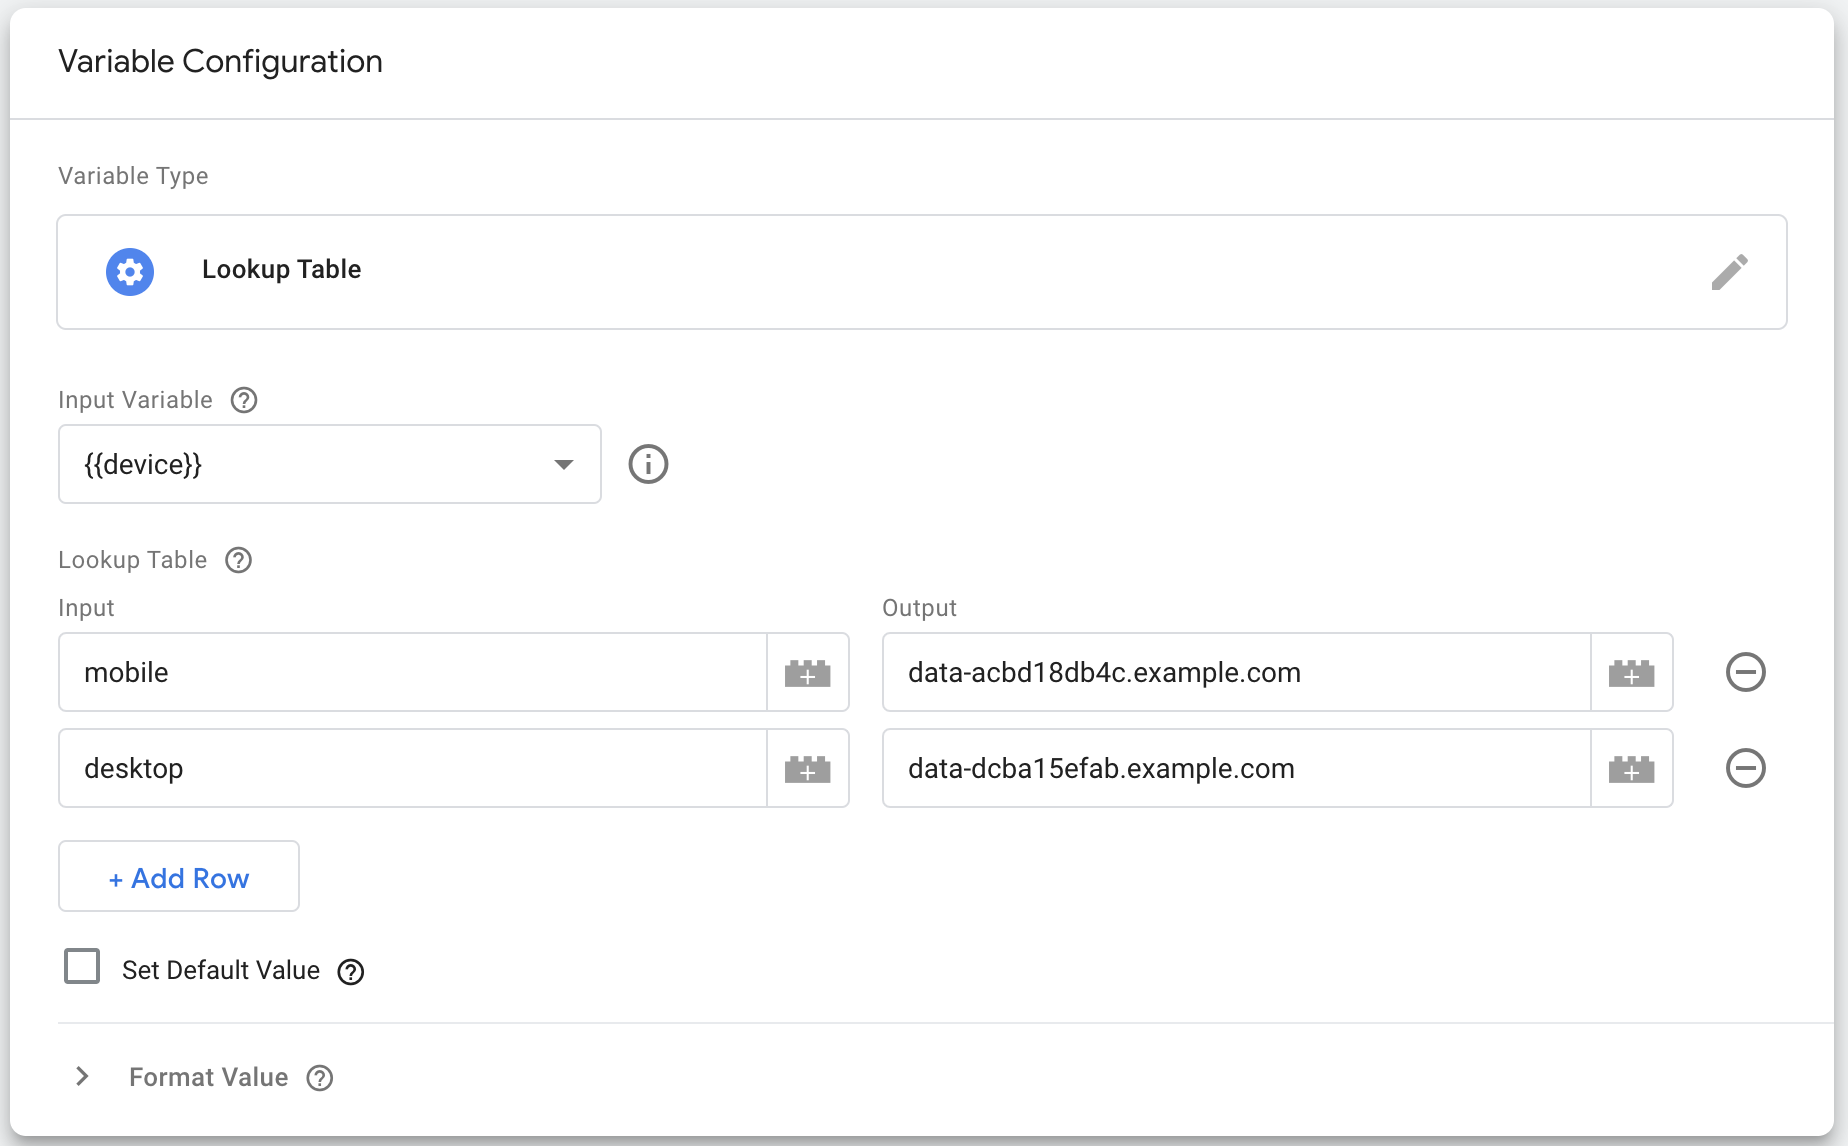
To add a lookup table variable for the domain service name of the service platform please click on Variables and then under User-Defined-Variables on New to create a new variable. On the popup slide top left choose a meaningful name for the variable. We recommend to use dsn as name. Then click on Choose a variable type to begin setup. Please select Lookup Table as Variable type and choose device as Input Variable. Add following rows with the specific domain service name of the service platform (CNAME) for mobile and desktop input and save setting (see screenshot above for more details).
| Input | Output | Example |
|---|---|---|
| mobile | <mobile domain service name> |
data-acbd18db4c.example.com |
| desktop | <desktop domain service name> |
data-dcba15efab.example.com |
The dsn will be used later in the dsn macro in all tags.
Create the tag to load the Measurement Manager
In your Google Tag Manager Account, click on Tags and then on New to create a new tag.
Give your tag a meaningful name and then click on Tag Configuration.
You need to select Custom HTML from the list.
Now we need to paste the following code into the HTML editor:
1 2 3 | |
The dsn macro will be replaced automatically with the AAA(A) or CNAME DNS entry of the service platform (relay client) from the lookup table specified as variable in the steps above.
It should look like this now:
Lastly we need to add a trigger, that will fire the tag when loading the website. For this click the Triggering area and select the Page View trigger type (All Pages).
Now we can save the first tag in the Google Tag Manager.
Create the tag to execute the configure and pageview commands
After we created the first tag to load the INFOnline Measurement Manager (web) script, we now need to create another tag to execute the configure and the pageview command.
Just like for the first step, we need to create a new tag, select Custom HTML from the list and paste the following code into the HTML editor:
1 2 3 4 | |
Please note that this is just an exemplary integration of commands. For the full list of available commands and the associated parameters, refer to the standard integration.
Now this is what it should look like:
Lastly we need to add a trigger, that will fire the tag when loading the website. For this click the Triggering area and select the Page View trigger type (All Pages).
Now we can save the second tag in the Google Tag Manager.
Publishing & Integrating the Google Tag Manager
After we created, edited and saved the two tags to load the INFOnline Measurement Manager (web) and execute commands, it is time to publish our container.
You need to publish the container each time you make changes to the tags in order for them to take effect. To do this click the Submit button on the right side of your Workspace screen in the Google Tag Manager.
If you haven't already done so, you need to integrate the Google Tag Manager on your website. For this please click on the container id (GTM-XXXX) on the right side of your Workspace screen in the Google Tag Manager. A popup will show up with code snippets and instructions. Please follow the instructions to integrate the code snippets on your website.
Different forms of integration
The above described integration of the Google Tag Manager is just exemplary. There are more ways to integrate it on your websites, especially by separating or using different commands (refer to the standard integration of the Measurement Manager for all available commands).
Please note that in any cases you always have to load the bootstrapping script with the Google Tag Manager when loading the website (described in the first step). It will load the best version of the INFOnline Measurement Manager (web) for the current contest and is therefore always needed.
What you can do is split the commands into separate tags in the Google Tag Manager, or use different commands.
As opposed to using a single tag for the configure and the pageview command like we did in step two, we could split the into two tags by using two Custom HTML elements - one for each command:
1 2 3 | |
1 2 3 | |
Attention
Please note that the configure command will only have to be executed once per page load.
If you have a Single Page Application, where you load the website once and subsequent changes of the view are handled internally by the framework without reloading the website, you will need to trigger the pageview command each time a new view is shown (Google recommends the History change trigger for this).
This does not apply to "standard" serverside rendered website, where each change of the view means a new request. There you still will need to trigger the configure & pageview commands for each website load.